|
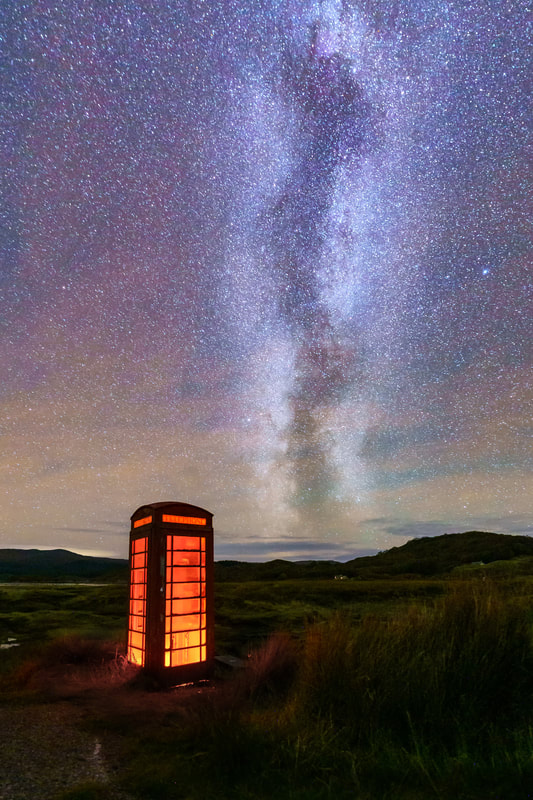
When I moved to the Peninsula, after living for almost 30 years in and around Glasgow, I was immediately blown away by the number of stars I could see in the sky on a dark, clear night. Seven years have passed, and I still get awestruck by the sight above me when I am out under a night sky. This is especially true at this time of the year, when our planet is facing inwards to the core of our galaxy, the Milky Way. So, this month, I thought I’d share a few tips for exploring our night sky, which is so dark that you can see over 7000 stars with the naked eye.  Flowing to the Stars II – Sanna, Ardnamurchan So how dark is a dark sky? Well, I have measured the darkness of the sky at various locations on the Peninsula using a device called a Sky Quality Meter (SQM) and obtained readings of between 21 and 22.5. To give you an idea of what this means, you would get a reading of around 8 in the middle of a major city such as Glasgow or Edinburgh and a reading of 24 would be measured in a photographer's dark room. So on some night, we are very near to total darkness, meaning that the Peninsula is a great place to enjoy a spot of stargazing. Where to Go
Castle Tioram, Moidart: Turn off the A861 just north of Acharacle and 2 miles down a narrow single track which should be driven with care. Once there you get good lines of sight in all directions except East. From the shore a little north of the car park, you can look out south and west to see the Milky Way and look North to catch the Northern Lights. Do not go out to the Castle as you may get caught out with the tide. Old Boat House, Ardtornish Estate, Morvern: A flat area of hardstanding, located between the shore and the track to Ardtornish Castle about 200 metres before the Old Boathouse on the shore of Lochaline. Park in the Estate Farm Courtyard where their Gift Shop is located and walk to the area near the boathouse from there. Ardnamurchan Lighthouse: Anywhere within the grounds of the Lighthouse Visitor Centre complex, but stay on the designated paths, picnic areas and carparks as this will keep you away from cliffs and sharp drops into the sea, which you must avoid in the dark. Clear views of the sky in all directions and the darkest place on the Peninsula due to its most westerly location. Bear in mind that overnight parking is not permitted on the site. When to GoThe best time to start stargazing is from 2 hours after sunset, when the sky is as dark as it gets. Also, it is best to do it in the week either side of a new Moon, when there is little or no moonlight to spoil the show. You can check the Sun and Moon times at www.thetimeandplace.info to decide what time is best and if you do go out: Use your naked eyes – You can see a lot with just your naked eyes, just give them 10-15 minutes to adjust fully to the dark and you’ll suddenly find that you’ll see twice as many stars. Use a red torch – Once your eyes have adjusted, avoid using bright white lights because it is very easy to lose your “night vision”. Instead use a red headlight or torch because this doesn’t affect you night vision. Stay warm – Clear, dark nights are often very cold, so wear plenty of layers, a hat and gloves and think about using heat wraps or charcoal hand warmers. Use Star Charts – These can be downloaded free from www.skymaps.com. You can also use one of the many smartphone apps that are available. I find Pocket Universe very good. 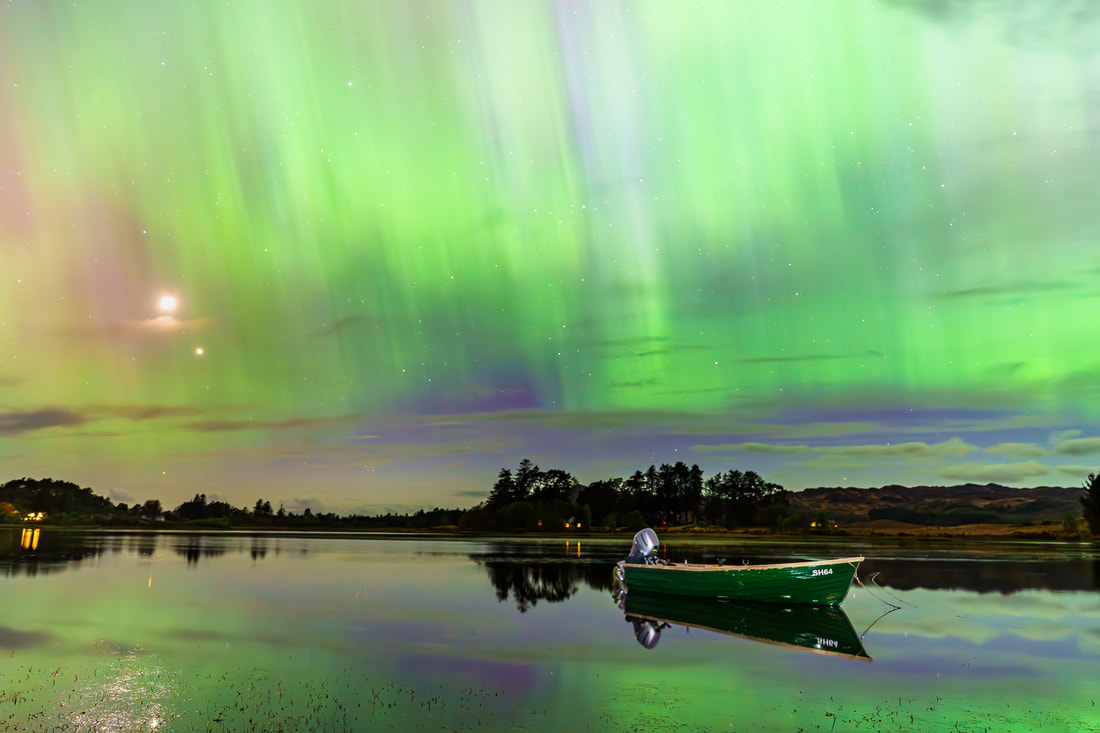 Unforgettable Aurora I - Loch Shiel, Acharacle, Ardnamurchan What to SeeWhen you are out, the things to look out for are:
Milky Way – Look directly overhead during autumn and early winter evenings and you'll see this shimmering river of light streaming through the constellations of Cassiopeia and Cygnus. Northern Lights – They can happen at any time of the year, but the best time is around the autumn and spring equinoxes because the geomagnetic activity that causes them hits the Earth’s atmosphere at just the right angle. Check the AuroraWatch UK website for alerts. Stars and Constellations – Look south in the next few months and you’ll see the grand constellations of winter: Orion, Taurus, Auriga, Perseus, Cassiopeia, Gemini, and Canis Major. They are rich with stars and star clusters, with the most brilliant stars being Capella, Castor and Pollux, Procyon, Sirius, Rigel, Aldebaran, and Betelgeuse. Planets – You’ll be able to find each of the visible planets of Mercury, Venus, Mars, Jupiter and Saturn at some point throughout the year. However, their position in the sky each month varies from year to year, so do check a night sky guide to find out which ones you will see. Meteor Showers – They happen at predictable times throughout the year. Look out for the annual Quadrantids (January), Lyrids (April), Perseids (August), Orionids (October), Leonids (November) and Geminids (December). When looking for them, spend at least an hour outside doing so because they tend to happen in fits and starts and beforehand, check the meteor shower guide at www.earthsky.org for the best times to look. Finally, you can learn more about what to look for by checking out my monthly night sky guides on this website, which you can find by clicking here.
2 Comments
The vernal (spring) equinox on 20 March heralds the arrival of spring and it is a great time of the year for observing one of the night sky’s most elusive phenomena: zodiacal light. This light will appear as a false dusk that is created by a triangular beam of light from the Sun being reflected off a fog of tiny interplanetary dust particles when it is beneath the horizon. It’s so difficult to see and many astronomers have never witnessed it, however, I was lucky enough to spot and photograph it at Castle Tioram on a dark moonless night on the first day of March last year. It should be visible on dark moonless nights over the next few weeks, so do keep an eye out for it. 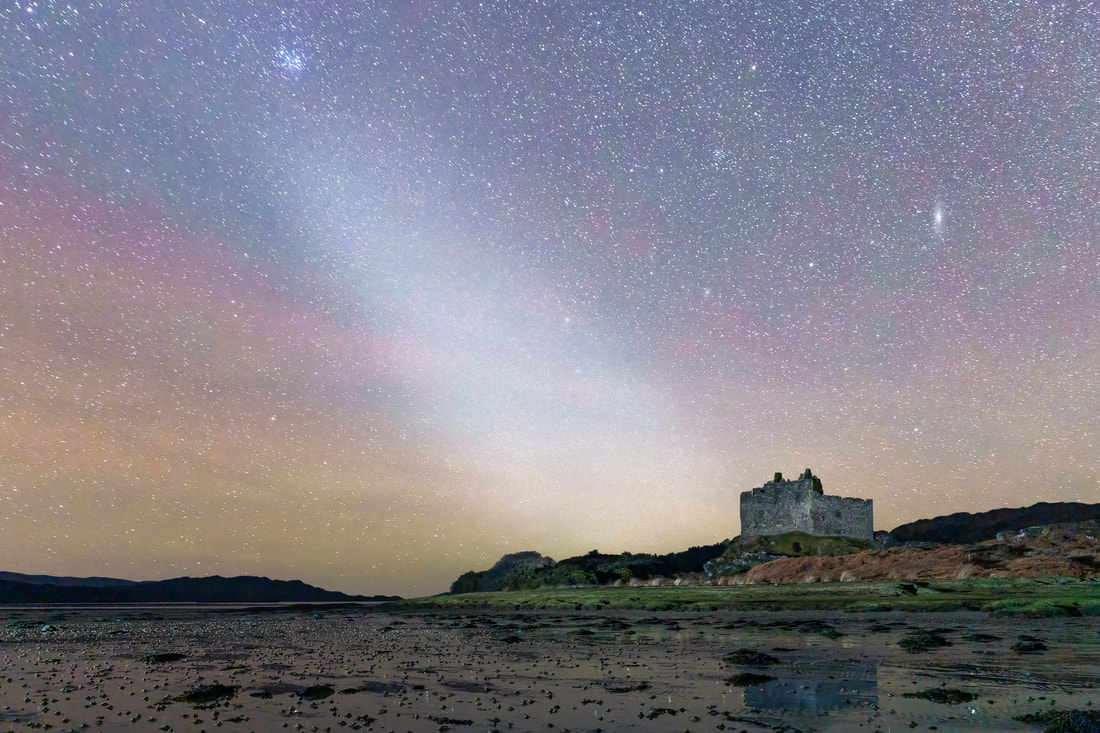 Image 1: Tioram and the Zodiac - Castle Tioram, Dorlin, Moidart Triangular zodiacal light, a feature of the night sky around the time of the equinoxes, shines up into the night sky above Castle Tioram Have you ever been outside at this time of the year, looking west and noticed what you think is lingering evening twilight, or the light of a nearby town shining up from the horizon? If so, you may well have seen zodiacal light in the sky and not realised. It is a triangular beam of light that shines along the line of the Zodiac, an 8° wide band that straddles the ecliptic, the invisible path that the Sun traces as it moves around the sky. It is the region of the sky where we can find the Sun, Moon and planets and is only 8° wide because most of the planets have orbits that are only slightly inclined to that of the Earth. The exception is Pluto, whose inclination of 17° takes it out of the Zodiac during part of its orbit. At this time of year, the Zodiac rises steeply from the horizon at dusk meaning zodiacal light does the same. People used to think that it originated somehow from phenomena in the Earth’s upper atmosphere, but today we understand it as sunlight reflecting off dust grains that circle the sun in the inner solar system, along the line of the Zodiac. The grains of dust were once thought to be left over from the process that created our Earth and the other planets of our solar system around 4.5 billion years ago, but in recent years, there’s been discussion about them originating from dust storms on the planet Mars. They are thought to be about a millimetre and less in size, densest around the immediate vicinity of the Sun and extending outward beyond the orbit of Mars and, when sunlight shines on these dust grains, it creates the light we see. 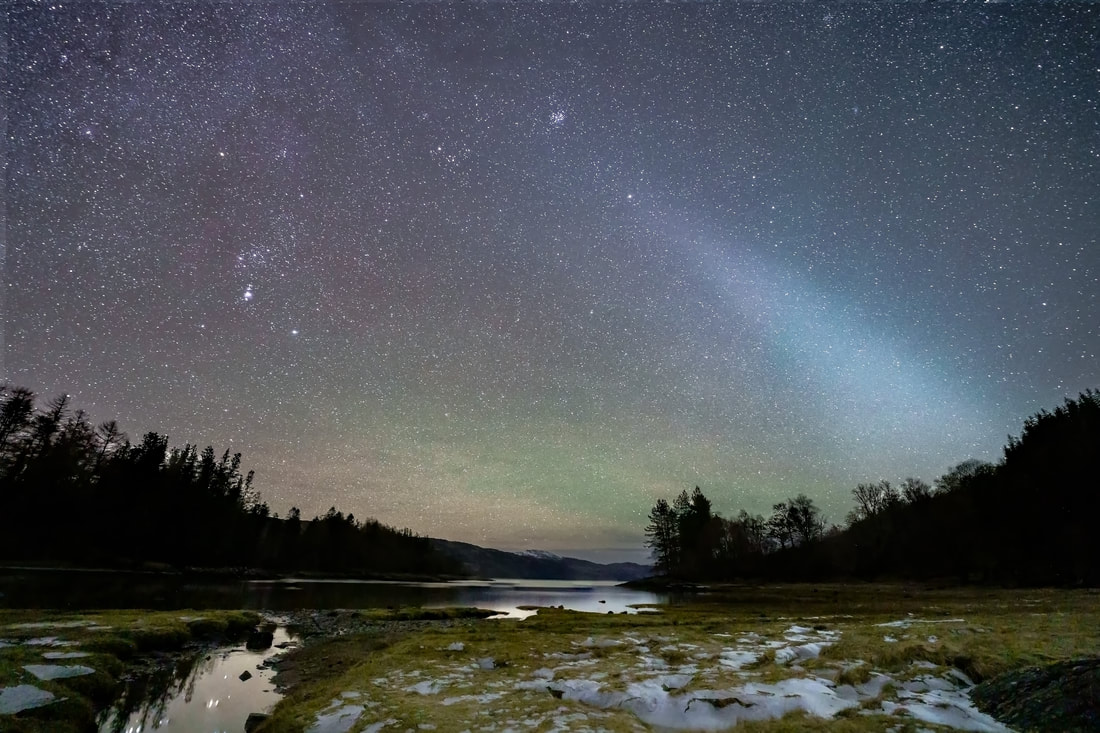 Image 2: Airglow and the Zodiac - Sailean nan Cuileag, Salen, Ardnamurchan Triangular Zodiacal Light extending from the western horizon, above a hint of airglow and up into the sky above Sailean nan Cuileag and Loch Sunart The light is fainter than the Milky Way, so the darker the night sky, the better chances of seeing it. It is best to go to a location with little or no night pollution, on a night when the moon is out of the sky and look for it in the west in the hour or two after sunset. If you are lucky, you may spot it as a ghostly pyramid of light rising steeply from the horizon.
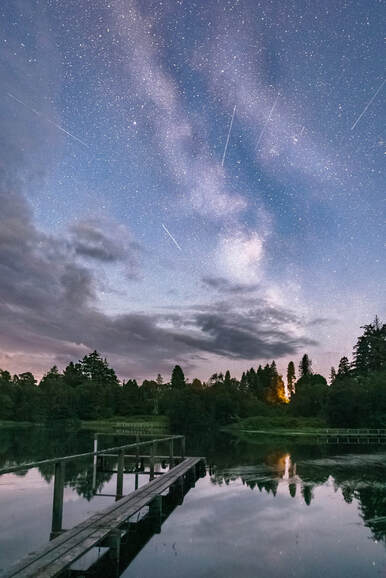
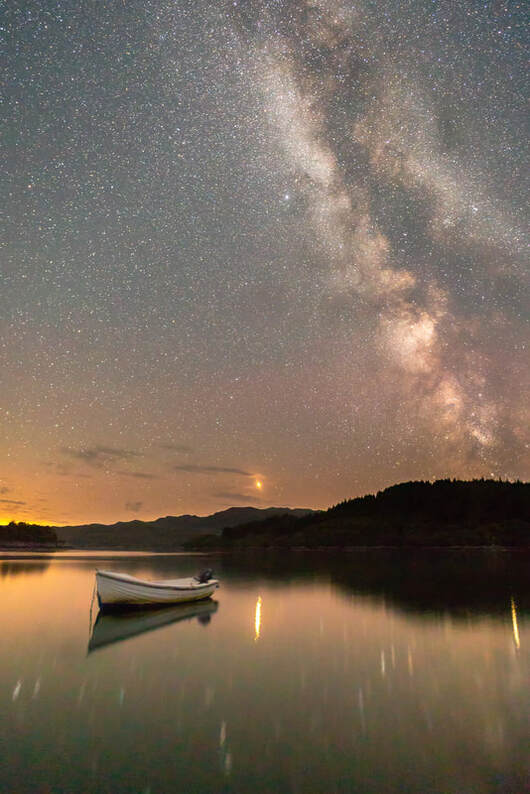
The best time to look for it in the coming month will be on the days either side of the equinox (20 March) as this coincides with a New Moon, meaning that there will be no moonlight to drown it out. With Venus and Jupiter, our night sky’s two brightest planets, being low down in the west after sunset, they’ll be visible close to or in the zodiacal light. Shortly after, on 23 and 24 March there will also be a thin crescent Moon sitting in the midst of the triangular beam of light as it shines upwards from beneath the western horizon. If you don’t see it in the next few weeks, you can try again in the autumn, but instead of looking for it in the west at dusk, you need to look for it in the east at dawn. This is because the Zodiac elliptic rises steeply from the eastern horizon at dawn in the autumn instead of rising steeply from the western horizon after dusk in the spring. We are now in August, the best month of the year for looking at and photographing the cloudy core of the Milky Way, the galaxy that is home to our Sun and 200 billion other stars. I find photographing this vast cloud of other stars and worlds an extremely humbling experience, especially when you consider that this single galaxy may contain 300 million potentially habitable planets and that there are a total of 170 billion other galaxies in the Universe as a whole. With mind-blowing numbers like these, we surely must consider the possibility of there being life beyond Earth. At this time of the year, the sun sets at around 9:00 pm and the stars and the constellations become visible from about 10:00 pm onwards. So, if you spend some time outside around then and look south, you’ll see the core of the Milky Way beginning to appear in the lower part of the sky. Having risen above the horizon in the southeast at about 7:00 pm, this cloudy mass of dust and stars will have travelled upwards and westwards to become visible as twilight ends. At this point, it reaches its highest point in the night sky and begins to drop down towards the horizon while it continues westward. It will eventually set around midnight, giving a period of about two hours during which it can photographed in all its glory. I was pleased to be able to do this when I captured the image below on a beautifully still and clear night from the Ardtoe Jetty in Kentra Bay.
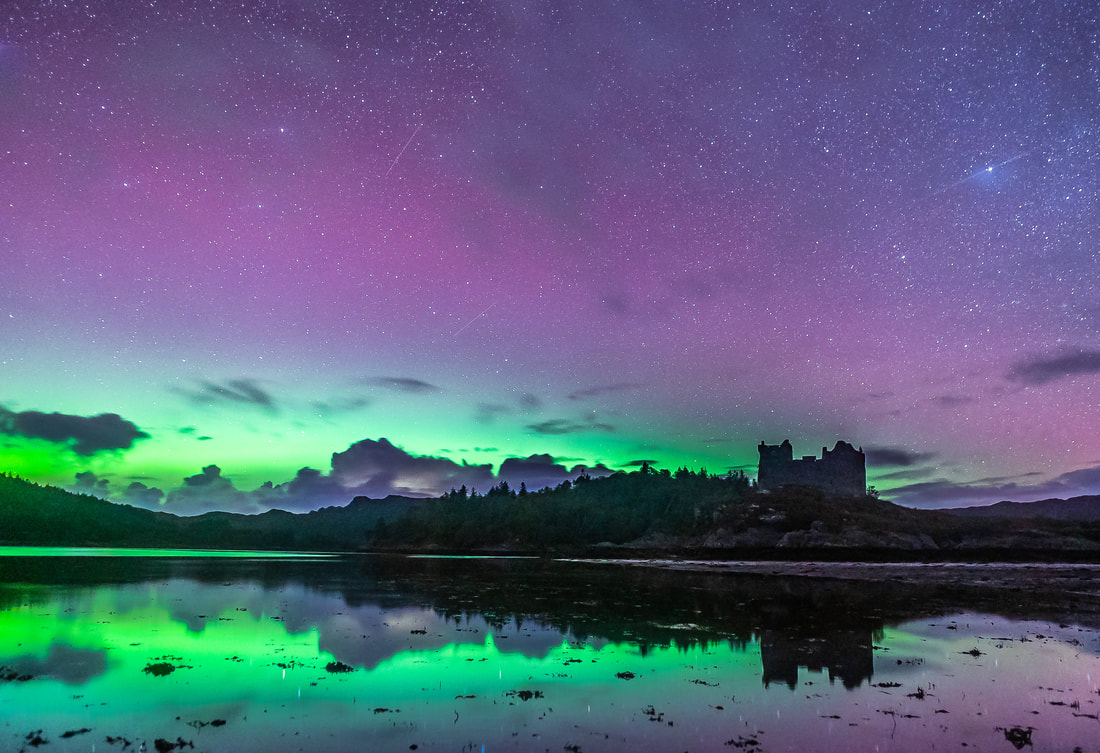
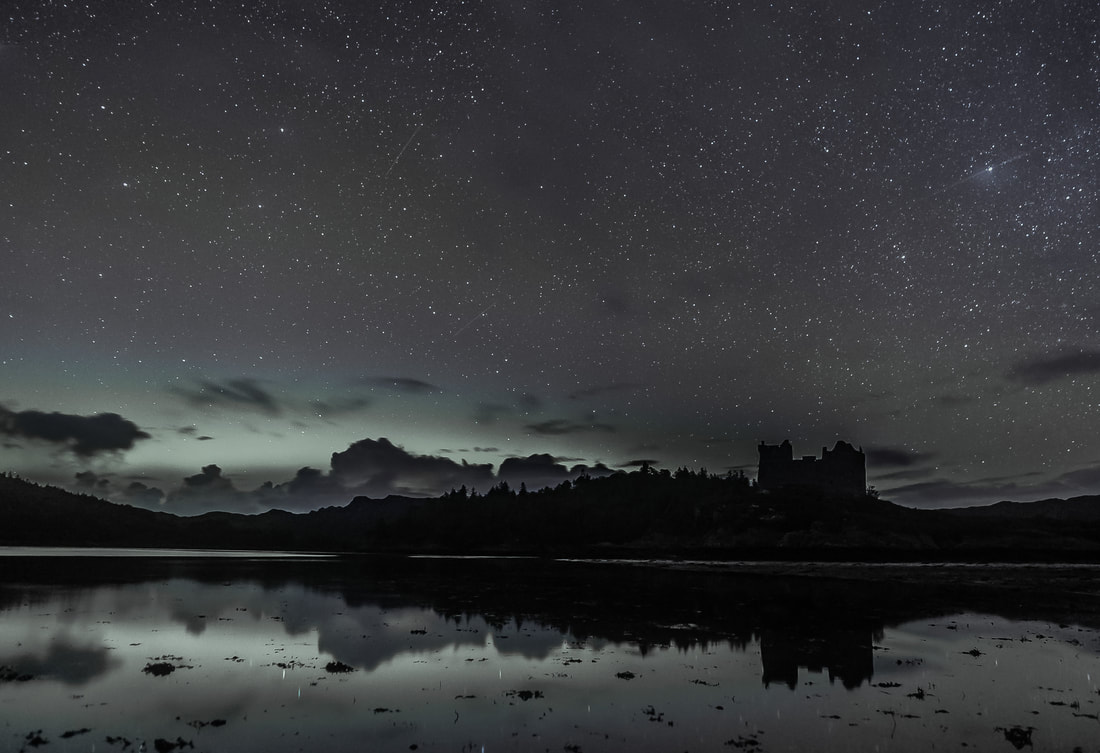
With each of these 170 billion galaxies containing an average of 200 billion stars, and with the current consensus among astronomers being that there should be at least as many planets as there are stars, it can be estimated that there are at least 34 sextillion (34,000,000,000,000,000,000,000) planets in the universe. This is an incomprehensibly large number of planets, and it does make you wonder if there is indeed life out there beyond Earth. Indeed, to date, astronomers have found 55 planets that are orbiting the habitable zones of stars and by extrapolating this to the number of stars in the Milky Way they estimate that there could be 300 million such planets in our galaxy alone. So, with this in mind, why don’t you go outside after dark on a clear August night and look south to see the cloudy core of the Milky Way, consider that someone may be looking back at you and remember this quote by Carl Sagan, the renowned astronomer and astrophysicist: “The universe is a pretty big place. If it's just us, seems like an awful waste of space.” 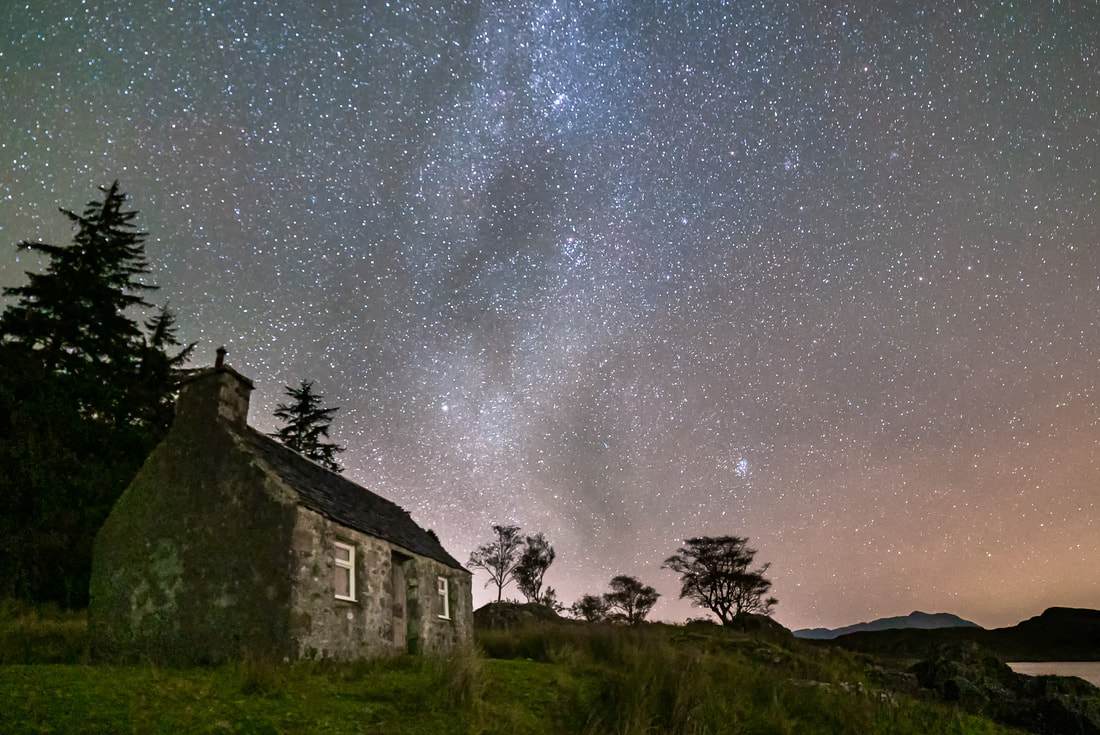 Life Beyond the Bothy III - Camas Chil Mhalieu, Kilmalieu, Ardgour When standing looking at the vastness of the night sky that lay beyond this small bothy, I couldn’t help but think about the probability of there being life beyond Earth The image below was taken on a September night at the Loch Shiel jetty in Acharacle when I had a client with me for some night photography tuition. We had been photographing the Milky Way in the sky over Loch Sunart when the Aurora Alerts went off, so we decided to head over to the jetty as it has a clear view north. We had a great time photographing the Northern Lights both here and at other locations close by. Some of the images from that night hang in my Studio at Resipole and they often prompt people to ask; “Can you see the Northern Lights here and are they really that green?”. My answer is always yes, but we can only perceive the aurora as a greyish-blue light. I then go on to explain the reason why... 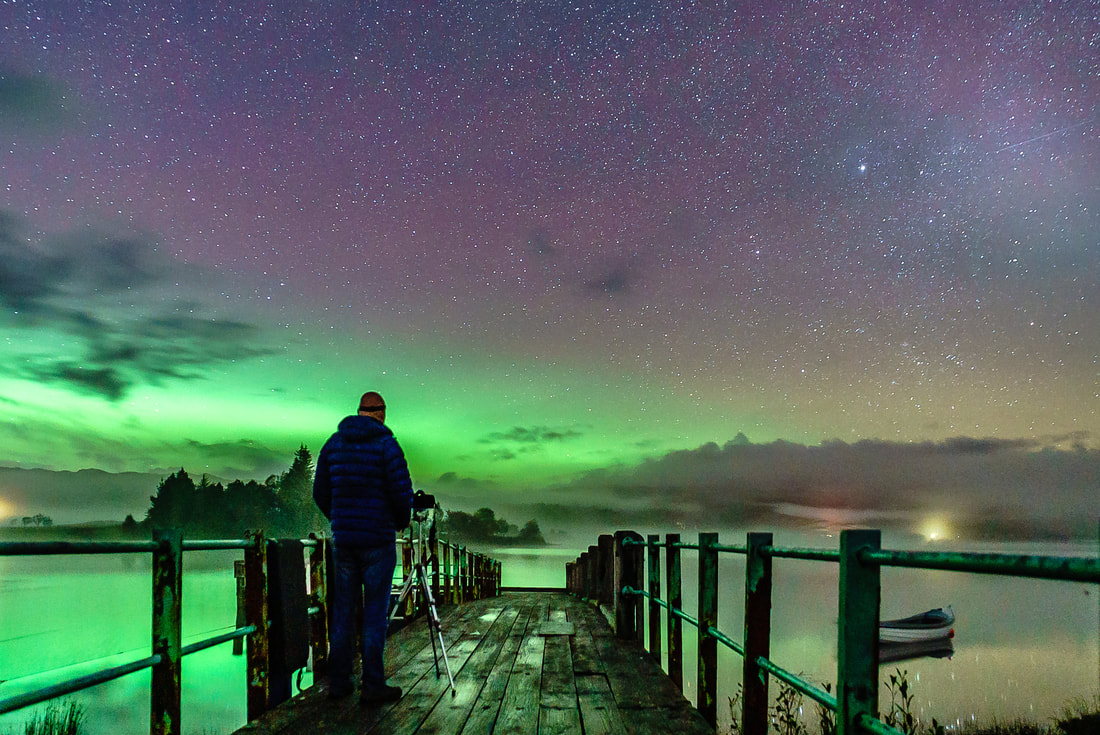 A client during his night photography lesson under the Northern Lights on the Loch Shiel Jetty at Acharacle It’s all because our eyes contain two types of photoreceptors (cones and rods) and how they work in the dark compared to how they work in daylight. Each retina has about 6 to 7 million cones and they provide the eye with the ability to distinguish colour. However, these cones only work effectively when it is light. On the other hand, there are about 120 million rods. These are far more effective at helping us to see in low light and near dark conditions, but they cannot distinguish colour. So, as it gets dark and the cones stop working, our eyes move from enabling us to see in full colour to only seeing in black and white. This means that anything we look at in the dark, including the Northern Lights, will only be seen in black, white and shades of grey. However, the sensors that you find in digital cameras do not suffer from this limitation and are extremely effective at picking up both light and colour in the dark. They can easily pick up the greens, reds, blues and purples that are present in the aurora, meaning that the colours you see in digitally taken images of the aurora are not a result of any photo editing but are, in fact, real. The auroral colours are a result of collisions between gaseous particles in the Earth's atmosphere and charged particles released from the Sun's atmosphere. The colours present in the aurora depend on the type of gas particles the charged solar particles collide with. Green is the most common because most solar particles collide with our atmosphere at an altitude of around 60 to 150 miles, where there are high concentrations of oxygen and these collisions with oxygen produce a pale yellowish-green colour. Blue and purple can also be present, but far less frequently than green because they only appear when solar activity is strong enough to cause particle collisions in our atmosphere at an altitude of 60 miles or less. At these heights, it is a reaction with nitrogen that causes the aurora to be tinged with purple or blue. On rare occasions, red can be present in the aurora, but only when the Sun’s activity causes solar particles to react with oxygen at altitudes above 150 miles or so. At this height the oxygen is less concentrated and is “excited” at a higher frequency or wavelength than the denser oxygen lower down in the atmosphere and so produces a purely red aurora. To give you an idea of the difference between what we can see and what the camera sees, I’ve prepared two versions of another image taken that night, but at Castle Tioram rather than Loch Shiel. These two versions are below, with the one on the left showing what the camera saw and the one on the right showing what I saw when I was taking the photograph.
Don’t despair though, as but there is a way you can experience the colours for yourself. Many modern phone cameras have a “Night Mode” setting that allows you to take bright, sharp and noise-free photos, even in the darkness of the night. So, the next time you hear of the aurora happening, head to a place with a clear view of the northern horizon, put you phone camera in “Night Mode” and use it to help you see the colours of the ‘Na Fir-chlis’. You will find a few more images of the Northern Lights in the “Our Night Sky” photo gallery on this website and if you’d like to arrange some night photography tuition, please feel free to get in touch.
When I moved away from the bright city lights of Glasgow to the unspoilt West Highland Peninsulas, one of the first things that struck me most was just how dark and clear the night sky was. I found that I could simply step out of the door of my house by the side of Loch Sunart and find myself looking up at the Milky Way and well over 7000 stars scattered across the sky above me. As my time on the Peninsula has passed, my interest in night photography has become a passion that produces some of my most popular images and I often get asked by visitors to my Studio about just how difficult night photography is. Well, the simple answer is that “It’s easier than you think” so, in this blog, I thought I’d explain why I think that this is the case. 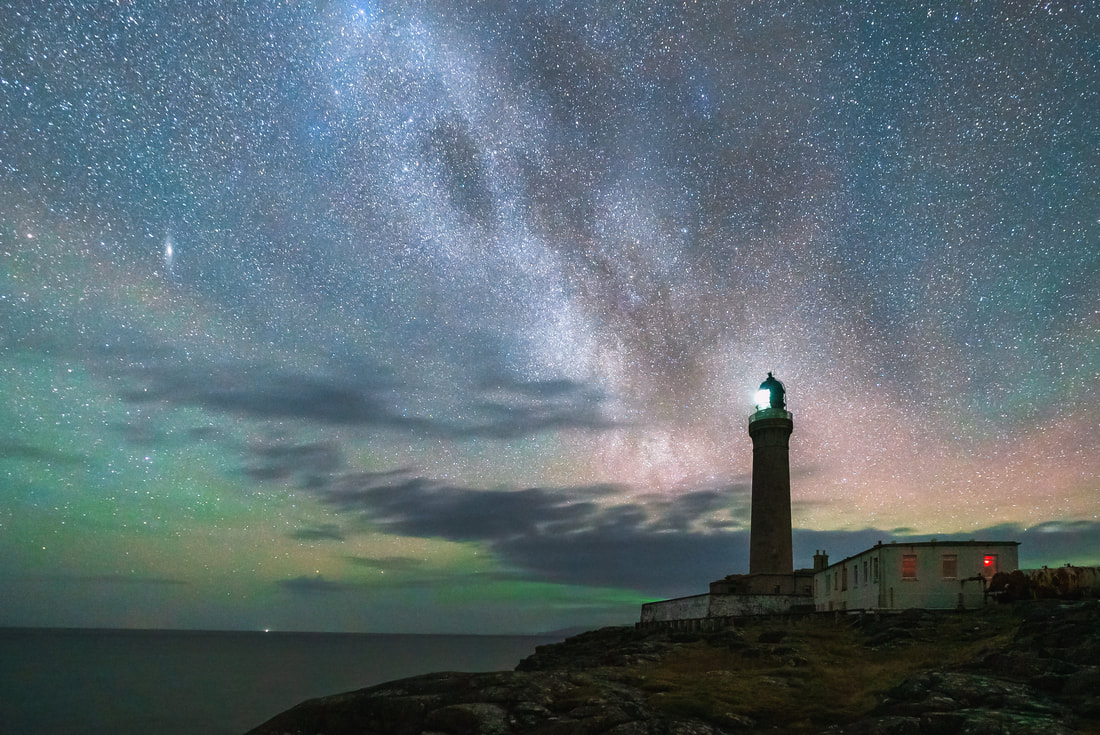 Image 1: Safe Night Passage - Ardnamurchan Lighthouse, Ardnamurchan Point, Ardnamurchan The reality is that you don’t need to buy lots of expensive equipment to capture your first images of the night sky. Any modern DSLR or mirrorless camera fitted with a wide-angle lens and mounted on a tripod will allow you to capture some lovely images of the night sky. So, if you have a full-frame sensor camera and a wide-angle lens with a focal length of about 30mm or less, you will be able to make a start at photographing the stars. Alternatively, if you have a 1.5x cropped sensor camera, a lens with a focal length of about 20mm or less will work fine. Ideally, these lenses should be able to open up to a wide aperture of f2.8 but if yours don’t, just give them a try at their widest setting and see how you get on. If you’re not happy with the results, you can always rent a lens for a little while to see if it is something you’re keen to get into, before deciding to buy a lens specifically for your night photography. 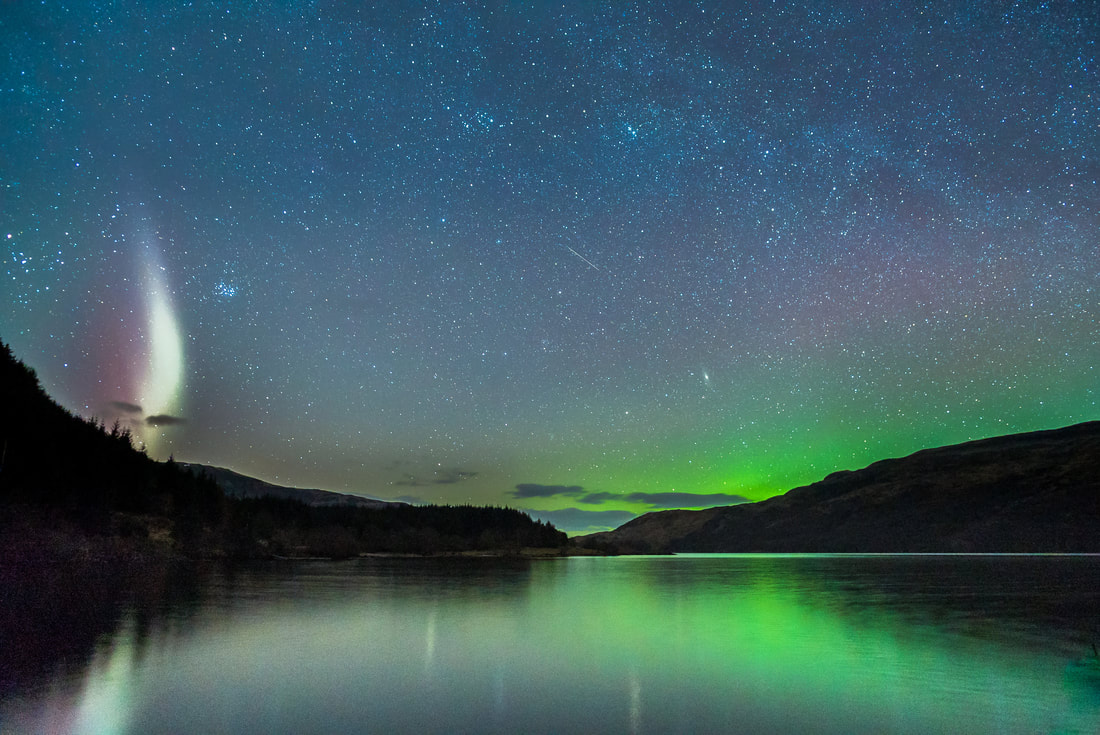 Image 2: Meet Steve - Camas Allt a’ Choire, Loch Arienas, Morvern The actual process of setting up your camera is not too difficult and in many ways, I think that it is far easier than setting it for daytime photography as there is basically only one setting to use. All you have to do is start no later than 45 minutes or so after sunset, while it is still getting dark, put your camera in manual mode, set it to capture RAW image files and then do the following:
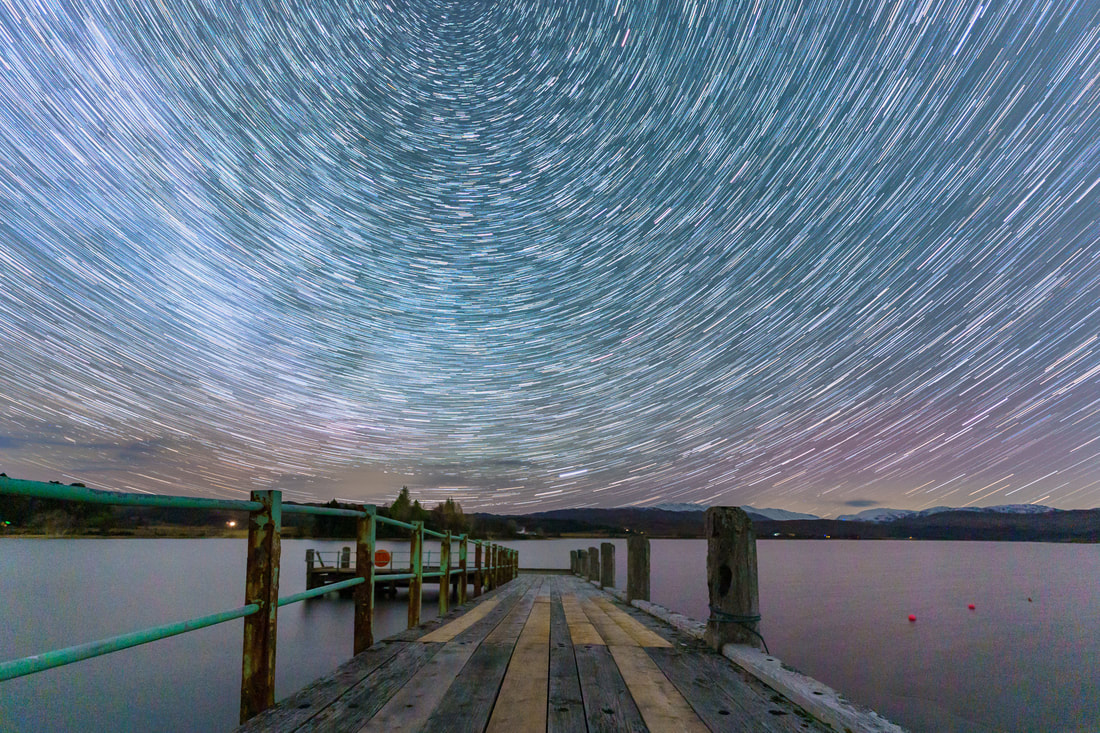 Image 4: Night Time Passing - Loch Shiel, Acharacle, Ardnamurchan You are now all set up but please be patient and wait for it to get sufficiently dark for the stars to show in your photo. This will usually be about 1½ hours after sunset. Once you think it is dark enough, select your camera’s 2 second timer and use it to avoid you pressing the shutter button during the camera exposure and causing any movement that might blur the image. Simply press the shutter button with the two second timer switched on, wait for the exposure to complete and then check the photo you have just taken. If you find it is under or over exposed, adjust your ISO accordingly, but avoid an ISO that is so high that it makes your photo’s noisy and grainy. When you have got a shot you are happy with, feel free to change the tripod location and camera position to capture a different composition, but avoid changing your aperture of focal length (dials previously taped to prevent accidental movement) as this will put your camera out of focus. Also, because It will most likely be completely dark by now, you might be best to use a torch to light your field of view while framing the new composition. 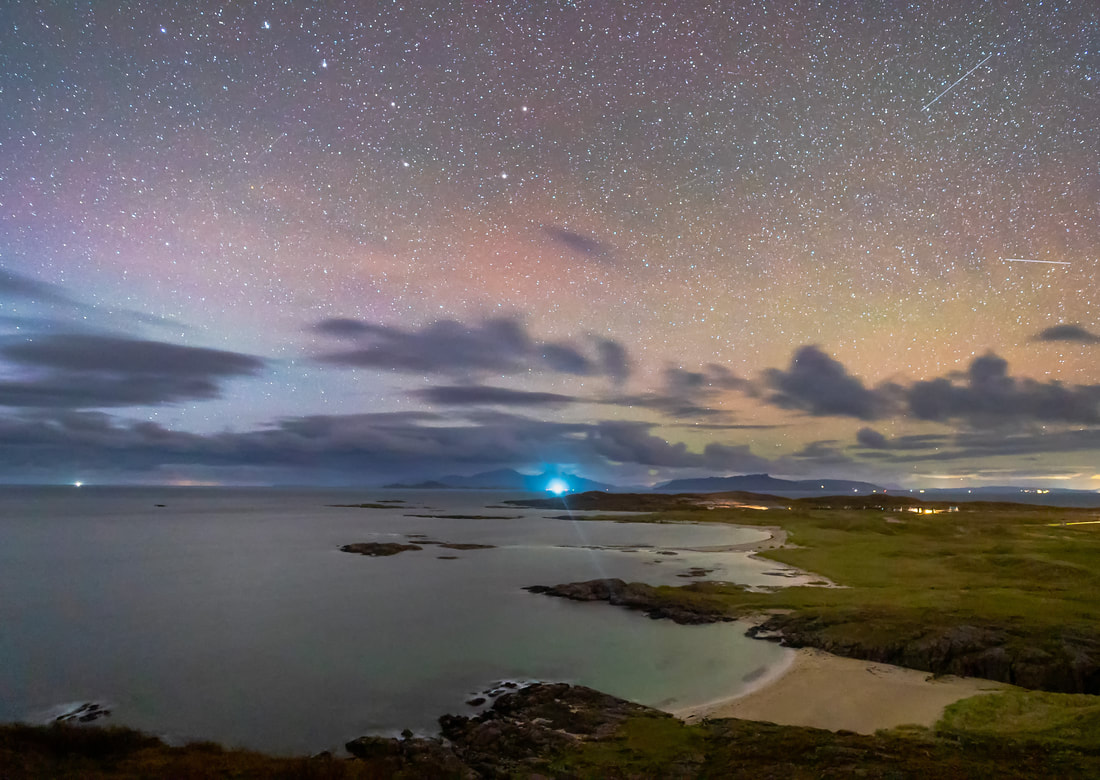 Image 5: Under the Plough I - Sanna Bay, Sanna, Ardnamurchan If you're planning a visit here to the West Highland Peninsulas of Ardgour, Ardnamurchan, Moidart, Morvern and Sunart, then here are some tips on how best to enjoy some of the darkest night skies in Europe 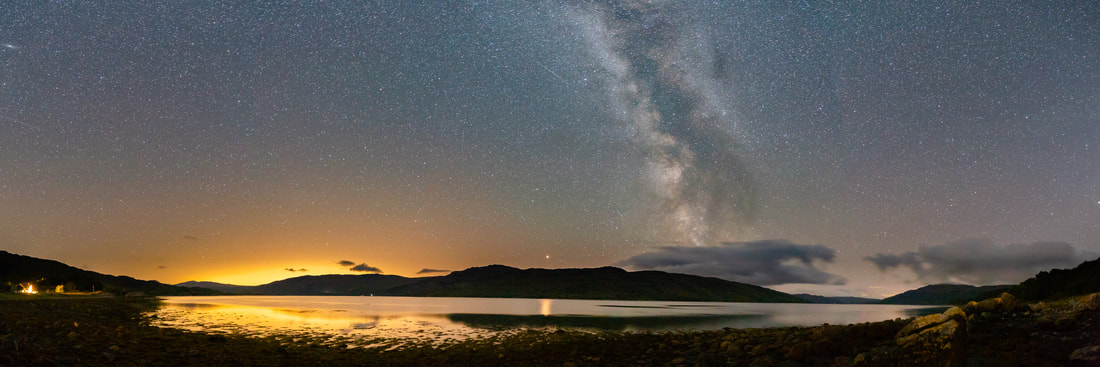 The autumn night sky from Rockpool House After living for almost 30 years in and around Glasgow, I moved to Rockpool House located right on the shore of Loch Sunart and was immediately blown away by the number of stars I could see in the sky on a dark, clear night. Three years have passed and my interest in night photography has become a passion that produces some of my most popular images and the recent acquisition of a telescope now has me doing a bit of stargazing. So, in this blog, I thought I’d share a few tips for exploring the night sky if you visit here and find yourself a under a sky that is so dark that you can see the Milky Way and over 7000 stars. Where to Go While I can walk out of the front door and see these 7000 stars, I usually go a little further afield to photograph the landscape under the night sky. I usually look for places with a clear view south or south-west to photograph the Milky Way and places with a clear horizon to the north that overlook water to photograph the Northern Lights. If you are here, then I suggest that you go to one of the seven places that are listed on the Dark Skies page of the West Highland Peninsulas website. When to Go I find that the best time to photograph or look at the night sky is in the time window between 2 hours after sunset and 2 hours before sunrise. As we are pretty far North, this means that the best times of year to look are Autumn, Winter and Spring when the nights are long and dark enough. Also, the light from the moon can make it difficult to see the stars, so it is best to look when there is little or no moon in the sky. Given this, it is best to check our local sun and moon times to decide when best to go out. You should also check the weather for when clear nights are forecast. How to Look
What to See
You will find the images featured in this blog, along with many more, in the “Our Night Sky” photo gallery. If you’d like a print of any one of them, please feel free to get in touch. Also get in touch if you’d like to arrange some night photography tuition.
|